前言
这一篇博客记叙跟踪人眼的算法,需要的参考资料挂在github上了,包括:
- classifiers, 被序列化为XML文件的分类器包括人脸检测器和人眼跟踪器。
- pyimagesearch, 自定义类包
- video, 待处理视频
- eyetrcking.py 主算法程序
算法主要任务:(1)检测视频每一帧里的人脸(2)提取人脸作为人眼跟踪的ROI区(3)在ROI区检测跟踪人眼
建立自定义类
由于我们要先检测到每一帧重点人脸,所以要像前面那两篇博客里讲述的那样要定义人脸检测函数,同理跟踪人眼同样需要一个函数,我们将这两个函数放在一个类里面,定义为EyeTracke。
它长这样子:1
2
3
4
5
6
7
8
9
10
11
12
13
14
15
16
17
18
19
20
21
22
23
24
25
26
27
28
29
30
31
32
33
34
35
36
37
38# import the necessary packages
import cv2
class EyeTracker:
def __init__(self, faceCascadePath, eyeCascadePath):
# load the face and eye detector
self.faceCascade = cv2.CascadeClassifier(faceCascadePath)
self.eyeCascade = cv2.CascadeClassifier(eyeCascadePath)
def track(self, image):
# detect faces in the image and initialize the list of
# rectangles containing the faces and eyes
faceRects = self.faceCascade.detectMultiScale(image,
scaleFactor = 1.1, minNeighbors = 5, minSize = (30, 30),
flags = cv2.CASCADE_SCALE_IMAGE)
rects = []
# loop over the face bounding boxes
for (fX, fY, fW, fH) in faceRects:
# extract the face ROI and update the list of
# bounding boxes
faceROI = image[fY:fY + fH, fX:fX + fW]
rects.append((fX, fY, fX + fW, fY + fH))
# detect eyes in the face ROI
eyeRects = self.eyeCascade.detectMultiScale(faceROI,
scaleFactor = 1.1, minNeighbors = 10, minSize = (20, 20),
flags = cv2.CASCADE_SCALE_IMAGE)
# loop over the eye bounding boxes
for (eX, eY, eW, eH) in eyeRects:
# update the list of boounding boxes
rects.append(
(fX + eX, fY + eY, fX + eX + eW, fY + eY + eH))
# return the rectangles representing bounding
# boxes around the faces and eyes
return rects
这里的init()函数仍做实例化类的“壳”, 它的三个参数:self为实例化类后的本身,faceCascadePath为人脸分类器(haarcascade_eye.xml)文件的路径,eyeCascadePath为人眼分类器(haarcascade_frontalface_default.xml)的路径 。track()函数用来实现在图像中找到眼睛并将人眼用边界框包围起来。需要传递的参数仅有一个即image待处理的每一帧图片。
调用faceCascadeclassifier的detectMultiScale返回图像中每个人脸的边界框位置(即,x,y,宽度和高度)。rects = []用来初始化将来储存人脸边界框和眼睛边界框位置的信息。第一个for循环用来将检测到的每一个人脸的边界框定义为face Region of Interest (ROI),下面将会以ROI区域提取出来并作为处理对象。同时将人脸的边界框位置信息储存在rect[]里.
然后,在ROI区检测跟踪眼睛,同样调用eyeCascade classifie的detectMultiScale返回图像中每个人脸中的眼睛的位置,需要注意的是眼睛边界框的位置坐标是相对于ROI坐标系而不是图片坐标系的,并将其储存在rect[]中。最后将储存所有人脸和眼睛位置信息的rects[]传出。
实例化算法
本部分要完成的任务有:(1)定义命令行解析并传参;(2)判断视频来自本地还是摄像头;(3)从视频里提取帧并做尺寸调整和灰度化(4)以rect[]里的元素为参画矩形即显示人脸和眼睛的边界框。代码段长这样:
from pyimagesearch.eyetracker import EyeTracker
from pyimagesearch import imutils
import argparse
import cv2


ap = argparse.ArgumentParser()
ap.add_argument('-f', '--face', required=True,
    help= 'path to where the face cascade resides')

ap.add_argument('-e', '--eye', required=True,
    help='path to where the eye cacade resides')
ap.add_argument('-v', '--video',
    help='path to the video file')
args = vars(ap.parse_args())


et = EyeTracker(args['face'], args['eye'])


if not args.get('video', False):
    camera = cv2.VideoCapture(0)

else:
    camera = cv2.VideoCapture(args['video'])


while True:
    (grabbed, frame) = camera.read()

    if args.get('video') and not grabbed:
        break

    frame = imutils.resize(frame, width=300)
    gray = cv2.cvtColor(frame, cv2.COLOR_BGR2GRAY)
    rects = et.track(gray)


    for rect in rects:
        cv2.rectangle(frame, (rect[0],rect[1]), (rect[2],rect[3]), (0,255,0), 2)


    cv2.imshow('Tracking', frame)


    k = cv2.waitKey(1) & 0xFF
    if k ==27:
        break


camera.release()
cv2.destroyAllWindows()
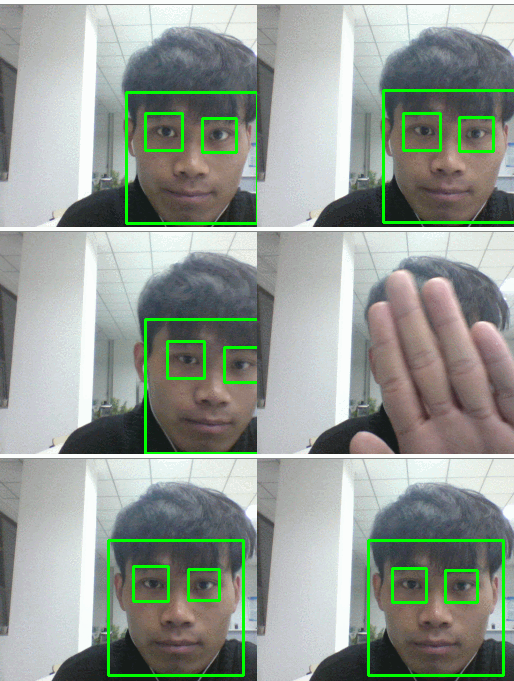
这里为了使人脸和眼睛检测更快,我们调整了图像的大小,使其宽度为300像素。算法执行结果如下:
